TenableCTF 2021 Tenable challenges writeup
This is my writeup for the challenges from the Tenable category that were part of TenableCTF 2021.
This being a CTF organized by Tenable, they had a category where you “used” their own tool (Nessus Essentials) in order to find flags.
They offered a NessusDB file (a fancy sqlite, basically) and you had to import it in your instance of Nessus Essentials.
The flags that I obtained were:
- mutant
- dead
- knowledge
- command
I got them in a different order (mutant->command->knowledge->dead) but I will present them in this order.
Also, I could not get the last flag (supercession).
I will include my thoughts on that one at the end of this writeup. At the moment of writing this I still don’t know where that one was hidden.
Setting up Tenable
You can get a license/activation key of Nessus Essentials that is able to scan up to 16 IP addresses for free on their website.
This is what they recommended for these challenges in their discord channel.
In order to get it up, first you have to get an activation key with the method mentioned above (it requires an email & name).
Then, you download an installer from here. You should get the correct installer for your platform and run it.
You are probably looking to get a .msi file for Windows, a .dmg for MacOS or a .deb, .rpm or a similar format for Linux.
I got the .deb file and installed it on a Ubuntu Server VM using dpkg (sudo dpkg -i ./Nessus-8.13.1-debian6_amd64.deb).
After the installation is done, you should go to the web UI to complete the setup and create an account on that Nessus instance.
When you’re done. You’ll see something like this (minus the imported scan).

The NessusDB
The file that we received was Linux_Scan.db.
It looks like a regular SQLite file but it cannot be opened with a sqlite explorer even if we know the password. This seems to be a customized version of the sqlite format.
Instead, we should import the file into our instance of Nessus Essentials that we installed before.
The ‘mutant’ flag
After the import was done, I chose to export a .nessus file. That is an XML file so at least I’m dealing with a text file.
The first command that I ran was.
cat *.nessus | grep flag

And we already found the first flag (mutant). This was easy.
In order to submit the flag, I had to replace “'” HTML entity with a single quote (‘).
This looks like they edited the export somehow and added a tag that won’t be displayed in the UI (I couldn’t find it in the UI).
The ‘dead’ flag
Next, the ‘dead’ flag. This was the trickiest one for me.
The names of the flags give some kind of hints about where they should be.
In this case ‘dead’ makes me think about a ‘dead’ host. This means that besides the two hosts that I can see, there was at least one more host that was not online (so it was ‘dead’ when the scan ran).
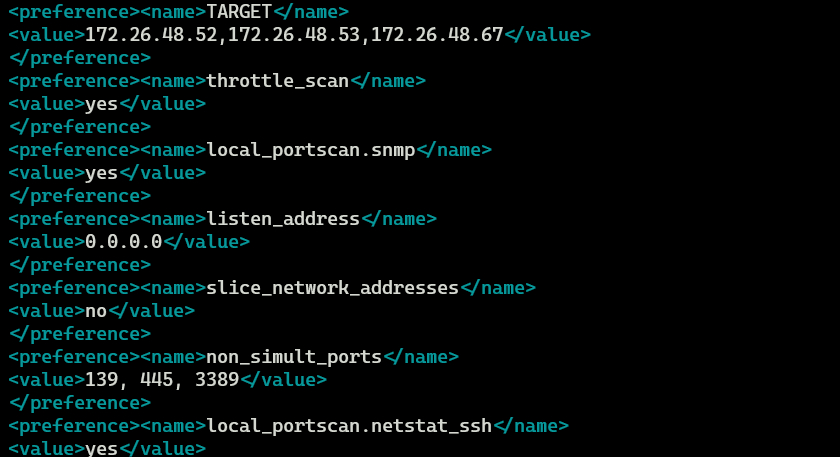
If we take a look at the exported .nessus file we can see that this is indeed correct and we have another host that was defined as a target in this scan:

We can see two targets in the UI but the file contains 3. The last one (172.26.48.67) might’ve been a dead/inactive host.
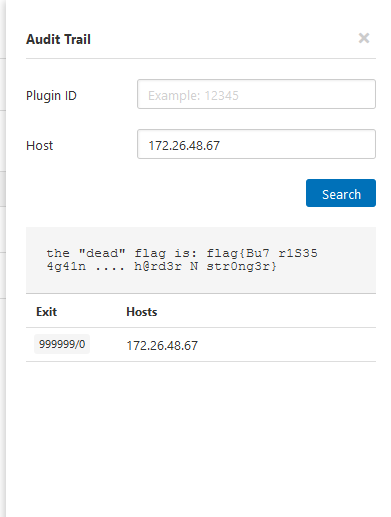
Now we can use the Audit Trail feature of Tenable in order to look up information about that specific target.

And here we find the second flag.
The ‘knowledge’ flag
As I said before, the names of the flags are quite suggestive for where you should look, especially if you worked with Nessus before.
The name of this flag (‘knowledge’) made me think that I should look at the knowledge bases (KBs) generated by Tenable for each host.

On the KB generated for 172.26.48.52 I could not find anything relevant for this challenge.
However, on 172.26.48.53 the last line contained the flag.

The ‘command’ flag
Now for the last one: the ‘command’ flag.
While looking around for the ‘knowledge’ flag I found some interesting things. There was a custom plugin that was run named ‘get_flag’.
The plugin was reading a file from /tmp and encoding it.
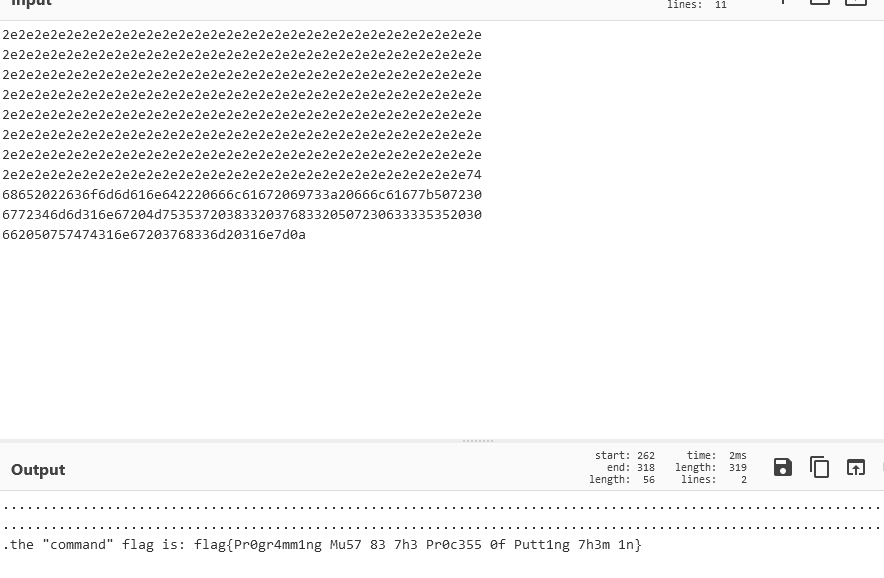
I used the Debugging Log Report plugin that gives me the output of the plugins that were ran during the scan.

On one of the hosts, the plugin had some output and we could see the encoded flag.

Now we just have to use something like CyberChef to decode it (using their ‘From Hex’ option).

The flag I could not get ‘supercession’
There was one more flag named ‘supercession’. The organizers said that it’s a difficult one to obtain and at the end of the CTF I have seen a very low number of solves for that one (2 or 3).
The things that I did not try but I think they might have been interesting were:
- trying to reverse engineer their NessusDB file and looking at it in its raw format
As I mentioned before, I could not open the file with a regular sqlite browser so they might’ve tried to hide something in there. - trying to dump the memory of the Nessus process while it is importing a scan or right after the import has been done
This might reveal some strings that were processed from the NessusDB file and then filtered out when displaying or exporting them.
At the time of writing this there is no public writeup for this challenge so I hope that one of the teams that managed to get that flag will publish their work.